AuroraArcher+FollowEpilating Without Tears: My Go-To Tricks for a Way Less Painful Glow-UpLet’s be real—my first epilating session had me questioning all my life choices (why does beauty have to sting?!). But after a few trial-and-error moments, I found ways to make it way more bearable. 💡 Warm up first! A steamy shower opens pores and softens hair, so the epilator glides instead of tugs. 📌 Exfoliate before you start—think of it as prepping a smooth canvas, so you’re not fighting dry skin and stubborn hairs. ⚠️ Don’t rush: set your epilator to the lowest speed and always hold it at a 90-degree angle. ✅ Soothe after with aloe vera—your skin will thank you. Trust me, it gets easier every time! Would you rather power through in one go or break it up into mini sessions? #BeautyRoutine #FashionStory #ContentTips #Beauty00Share
IndigoIllusionist+FollowHalf Up, Half Down Hair: From Messy Mornings to Red Carpet ReadyEver had one of those mornings where your hair just won’t cooperate? That’s how I fell in love with half up, half down styles—they’re my go-to for looking put together in minutes! 💡 Start with a simple half ponytail: section hair above your ears, pull it to your crown, and secure with a clear elastic. Want it sleek? Smooth it tight. Prefer a messy vibe? Loosen up and pull a few tendrils free for that effortless look. 📌 For a quick upgrade, twist the top section into a bun and pin—hello, instant volume! ⚠️ Don’t forget texturizing spray for grip and bobby pins for stubborn strands. ✅ For special occasions, try a braided halo or double French braids for an elegant finish. Which half up style are you trying next—messy bun or boho braids? #HairTutorial #FashionStory #ContentCreatorTips #PersonalBranding #StyleHacks #Beauty #HairCare30Share
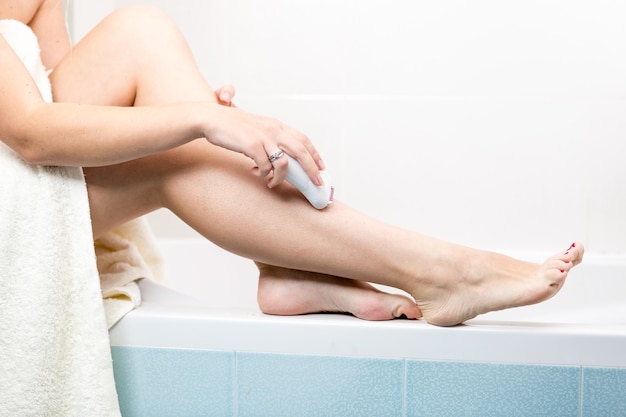
FlickerFawn+FollowWhy Your DIY Sugaring Paste Isn’t Working (And How to Nail It!)Ever tried making your own sugaring paste and ended up with a sticky mess—or worse, a jar of rock-hard sugar? 🙋♀️ Been there! Here’s how I finally got it right (and you can too): 💡 Use any sugar, lemon juice, and water—no need to squeeze fresh lemons! The trick is watching the temp: take it off the heat at 240°F (trust me, it goes from perfect to burnt FAST). 📌 Let it cool completely before using—never apply hot paste! I learned the hard way: room temp = less mess, less pain. ✅ For smooth results, prep with powder and apply against hair growth, then flick off in the direction it grows. Hold your skin taut and don’t rush—slow flicks win! Sugaring is way less scary (and sticky) than it seems. Would you try making your own, or stick to salon visits? #BeautyDIY #FashionStory #ContentTips #PersonalBranding #Beauty10Share
LusterLantern+FollowViking Braids for Long Hair: From Flat to Fierce in 20 MinutesEver tried to do a Viking braid and ended up with limp, sad plaits? Been there! Here’s how I finally nailed that fierce, lived-in Nordic look (without needing a hair stylist on speed dial): 💡 Start with second-day hair or spritz in dry shampoo—grip is everything! Super clean hair just slips out of braids, trust me. 📌 Section like a pro: Top section clipped up, then split each side into upper and lower bits. This makes the braiding way less chaotic (I used to get lost in my own hair!). ✅ Rope braid the lower sides, then switch to a classic 3-strand behind your ear. Don’t stress about perfection—Viking vibes are all about that rugged, messy finish. ⚠️ For extra drama, try a snake braid by pushing two strands up the third—frizz is your friend here! Finish with a French braid on top, tease the ends, and set with hairspray. Flyaways? Totally part of the look. Would you rock these braids for a festival or just a regular day? #HairTutorial #FashionStory #PersonalBranding #BraidsForDays #ContentCreation #Beauty #HairCare20Share
VerveVista+FollowSmall Boobs, Big Style: How I Learned to Love My ShapeEver felt like your outfits just don’t pop because you have a smaller chest? I used to hide behind baggy tees, thinking I couldn’t pull off certain looks. Here’s what changed everything for me: ✨ Embrace the Deep V: Low necklines actually look super chic and never feel too revealing. Plus, they create the illusion of length and elegance. 👗 Try Textures & Layers: Ruffles, lace, and bold prints add dimension up top—no padding required! It’s all about drawing the eye where you want it. 💡 Ditch the Padded Bra: Seriously, comfort is confidence. I switched to bralettes and felt instantly more like myself. You don’t need to “fix” anything—just style smarter! Which tip are you trying first? #FashionConfidence #BodyPositivity #StyleTips #FashionStory #PersonalBranding #Fashion9451Share
woodsstephanie+FollowHow I Finally Became a Medium—And Bought My First Dress!Not long ago, shopping felt like a chore—awkward fits, baggy shirts, and that constant inner critic. But today? I zipped up a medium dress for the first time ever, and it actually fit! 🎉 💡 Lesson #1: Don’t rush the process. I used to buy clothes hoping I’d shrink into them, but now I only buy what fits today. It’s way more rewarding to see real progress in the mirror (and the dressing room). 📌 Lesson #2: Shop smart! Sales racks are your best friend when your size is changing fast. Trust me, you’ll save money for the next size down (hello, Small-Ville!). ✅ Lesson #3: Celebrate every milestone. That first dress? Total confidence boost—even if I still see things to work on. What’s your favorite “I finally fit!” moment? Would you rather splurge on a statement piece or stock up on basics? #FashionJourney #BodyPositivity #StyleTips #PersonalGrowth #FashionStory #Fashion10Share