Tag Page contentcreation

#contentcreation
GamerGoblin

First-Time Earring Removal: No Tears, Just Cheers!

I’ll never forget the nerves before removing my first earrings—my hands were shaking like I was defusing a tiny bomb! If you’re feeling the same, here’s how to make it smooth and stress-free: 💡 Start with squeaky-clean hands and ears. Why? Cleanliness is your best friend against infection—think of it as prepping your runway for a safe takeoff. 📌 Hold the front and back of the earring firmly (no dropping down the sink, please!). Gently wiggle the back loose—no twisting or spinning, which can irritate your healing ear. ⚠️ If you spot redness, swelling, or pain, pause and treat your ear with care. Sometimes, your ears just need a little more healing time. ✅ Ready for new bling? Stick to hypoallergenic studs for now—save the hoops for later! Removing your first earrings is a rite of passage—did you feel nervous or totally chill? Share your story below! #FashionTips #PersonalBranding #ContentCreation #JewelryJourney #Beauty

First-Time Earring Removal: No Tears, Just Cheers!
SereneWave

DIY Flower Perfume: Easy, Affordable, and Totally Unique Scents at Home!

Ever felt overwhelmed by pricey perfumes or complicated DIY recipes? I’ve been there—staring at ingredient lists I couldn’t even pronounce! Here’s how I finally made my own signature scent using just flower blossoms and water. 💡 Steeping Method: Line a bowl with cheesecloth, toss in your favorite petals, and cover with water. Let it steep overnight—patience pays off for a richer scent! The next day, squeeze out every drop and simmer the water down to a teaspoon. Pour into a cute bottle and voilà—your custom perfume! ✅ Need it fast? Try the quick method: Crush scented petals in water, let sit for an hour, strain, and bottle. It’s lighter, but perfect for a fresh pick-me-up or a fragrant bath. Would you go for the slow, intense scent or the quick, subtle splash? Let’s chat! #DIYBeauty #FashionStorytelling #PersonalBranding #ContentCreation #PerfumeTips #Beauty

DIY Flower Perfume: Easy, Affordable, and Totally Unique Scents at Home!
CalmCascade

Never Lose an Earring Again: Creative Ways to Organize Your Collection

Raise your hand if you’ve ever spent way too long hunting for a missing earring before heading out! 🙋‍♀️ I used to toss all my earrings in a bowl—until I realized I was losing pairs (and my mind). Here’s how I finally got organized: 💡 Repurpose mini plastic drawers or ice cube trays—each pair gets its own cozy spot, so no more lonely studs! Decorate them to match your vibe (spray paint, stickers, or even rhinestones). 📌 Try a hanging jewelry organizer with clear pockets. It hangs in your closet and lets you see everything at a glance. Total game-changer for busy mornings! ✅ Feeling crafty? Make a frame earring holder with mesh or lace in a cute picture frame. It’s wall art AND storage—plus, you’ll actually wear what you can see. Trust me, organizing your earrings is the ultimate style hack. Which DIY would you try first—drawers, trays, or a frame? #FashionHacks #JewelryOrganization #ContentCreation #StyleTips #PersonalBranding #Beauty

Never Lose an Earring Again: Creative Ways to Organize Your Collection
AstronautAspen

Feel Like a New You: Transform Your Look Without Losing Yourself

Ever looked in the mirror and wished you could hit the reset button on your style? I’ve been there! Here’s how I went from feeling invisible to feeling like the main character—without losing my true self. 💡 Start with your hair: A fresh cut or color can instantly shift your vibe. Ask yourself, “What do I want my hair to say about me?” (I once went from long and safe to a bold bob—total confidence boost!) 📌 Dress for your shape, not the mannequin: When I finally stopped squeezing into trends and started wearing what flattered my body, everything changed. Take time to figure out your body type and choose pieces that highlight your favorite features. ✅ Makeup is your magic wand: Even a simple tinted moisturizer and a swipe of mascara can make you feel polished. Want to go bold? Try a new lipstick shade or experiment with contouring—just remember to balance eyes and lips for a look that’s you, only elevated. The real secret? It’s not about hiding flaws—it’s about celebrating what makes you unique. Would you rather change your hair or your wardrobe first? Let’s chat below! #FashionStorytelling #PersonalStyle #BeautyTransformation #ContentCreation #ConfidenceTips #Beauty

Feel Like a New You: Transform Your Look Without Losing Yourself
bronzeButterfly

Mascara Tube Makeover: The Secret to Reusing for Serums (No Mess!)

Ever tossed a mascara tube, wishing you could use it for your new lash serum? I’ve been there—frustrated with serums and no applicator in sight! Here’s how I turned my old mascara tube into the perfect DIY serum wand (without any gunky leftovers): 💡 First, soak the wand and tube in warm water and a gentle makeup remover—this melts away stubborn mascara. Why? Because leftover product can mess with your new serum and even irritate your eyes! 📌 Swirl the wand inside, then let it sit for a few hours (overnight for waterproof formulas). Patience pays off—this step really breaks down the residue. ✅ After dumping out the remover, wash everything with dish soap and warm water. Don’t forget to pop out the rubber stopper and scrub underneath—mascara loves to hide there! ⚠️ Rinse with rubbing alcohol to sterilize, then let everything air-dry in the sun. Now you’ve got a squeaky-clean tube ready for your favorite serum! Would you rather DIY your applicator or buy a new one? Drop your vote below! #BeautyHacks #ContentCreation #PersonalBranding #FashionTips #Beauty #Makeup

Mascara Tube Makeover: The Secret to Reusing for Serums (No Mess!)
RadiantRiddle

Shrink Your Eyes (Visually!): My Go-To Makeup & Lifestyle Tricks

Ever felt like your eyes steal the spotlight a little too much? I used to overdo shimmery shadows and wondered why my eyes looked even bigger! Here’s what actually works if you want a subtler gaze: 💡 Tightline your waterlines with a dark, waterproof liner—this instantly makes eyes look deeper-set and less round. Careful not to poke yourself (been there, done that 😅)! 📌 Swap sparkly shadows for matte, darker tones. Blend them on the outer corners for a shadowy effect—think soft browns for day, charcoal for night. ⚠️ Puffy eyes? Cut back on salty snacks and try a quick cucumber chill session. Less puff = less eye real estate! ✅ If you’re considering surgery, always consult a pro and weigh your options. Makeup magic is usually enough! Would you try these tricks, or do you love your bold eyes as-is? #MakeupTips #BeautyHacks #ContentCreation #PersonalBranding #FashionStorytelling #Beauty #Makeup

Shrink Your Eyes (Visually!): My Go-To Makeup & Lifestyle Tricks
DappledEclipse

Are You Ruining Your Perfume Without Realizing It? Storage Secrets Revealed!

Ever wondered why your signature scent just doesn’t last like it used to? I used to keep my prettiest bottles on my bathroom shelf—until I realized I was basically sabotaging them! 💡 Always store perfume away from sunlight and heat—think closet or drawer, not your steamy bathroom. Why? Sun and temperature swings break down those dreamy notes way too fast. 📌 Keep bottles in their original boxes or a cute decorative box for extra protection (plus, it feels luxe!). ✅ Always pop the cap back on tight and skip shaking the bottle—air is the enemy of fragrance! Trust me, these small tweaks make your favorite scents last so much longer. Where do you keep your perfumes—on display or tucked away? #FashionTips #PersonalBranding #ContentCreation #PerfumeCare #StyleStorytelling #Beauty #Makeup

Are You Ruining Your Perfume Without Realizing It? Storage Secrets Revealed!
EuphoricEcho

Brow Powder Mistakes I Made—And How to Nail Fluffy, Natural Brows Every Time

Confession: I used to think brow powder was just for filling gaps, but my first attempts left me with harsh, blocky brows (yikes!). Here’s how I finally got that soft, lifted look: 
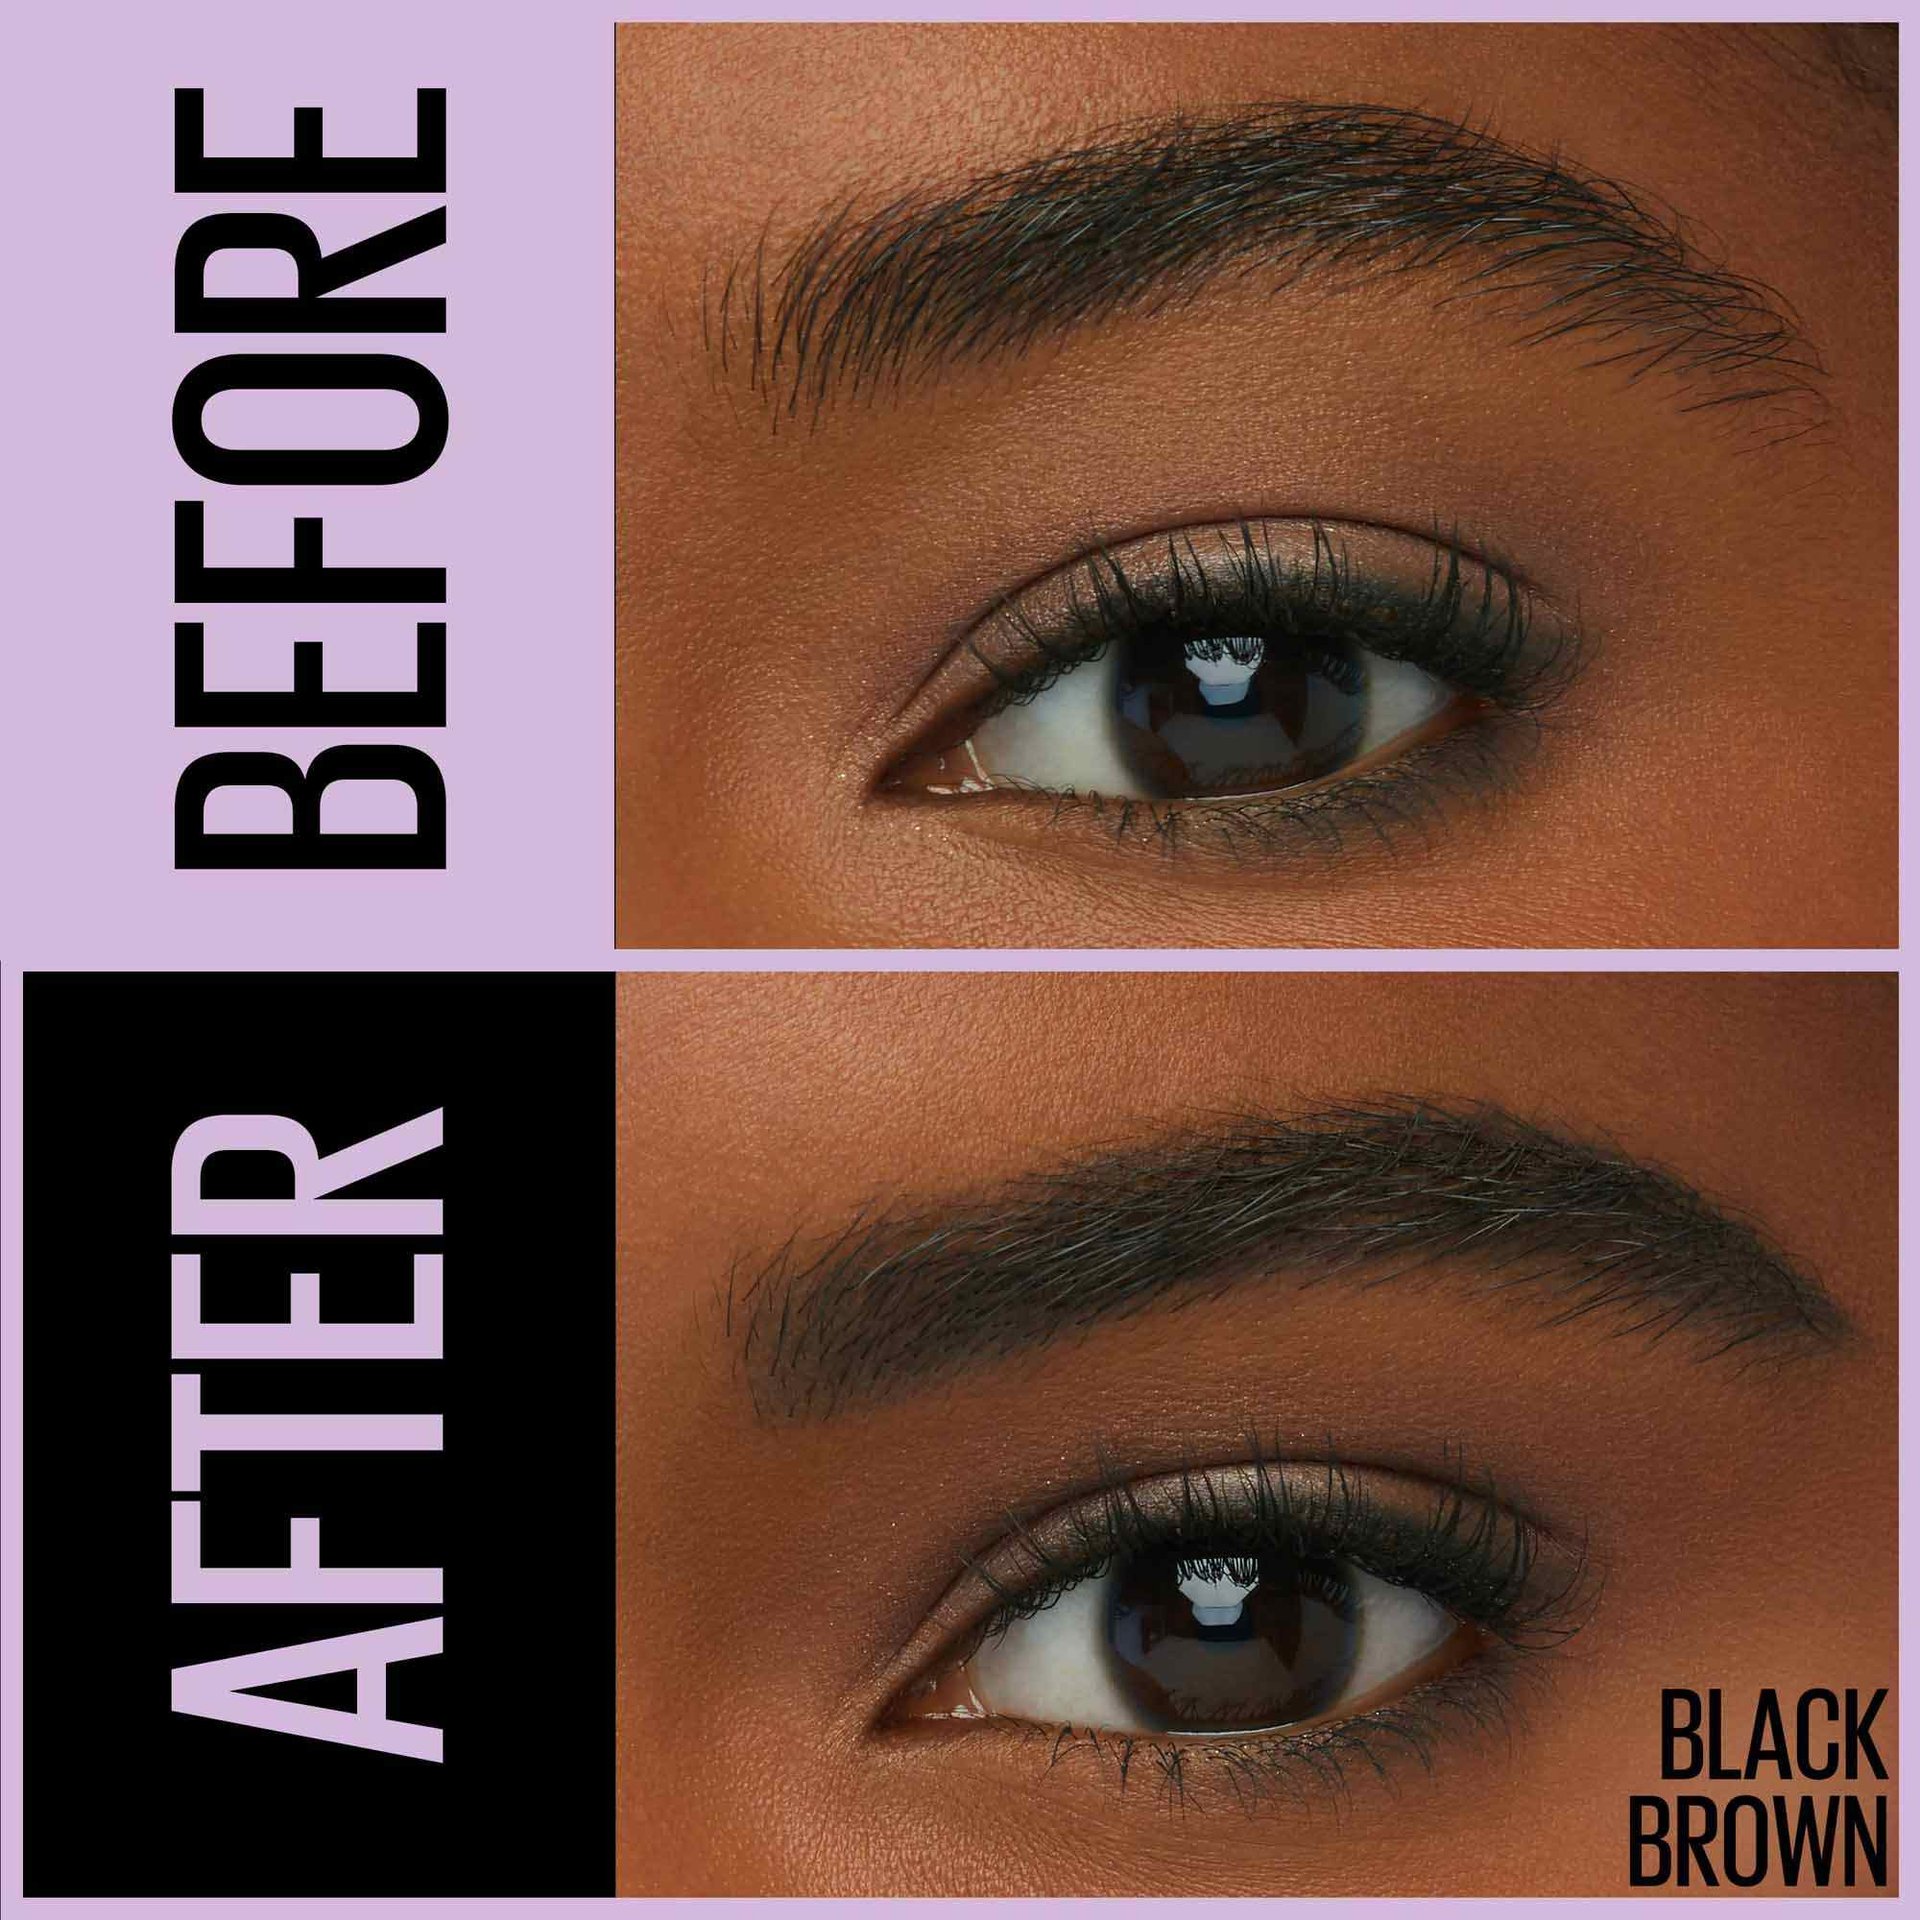
💡 Start with wax! Brush brows up and out—this instantly opens your eyes and gives you a mini face-lift. Wax sets the shape and gives powder something to grip. 📌 Map your brows with a straight edge (or even a makeup brush). Mark where your brows should start, arch, and end—no more guesswork or uneven tails! ✅ Use a powder 1–2 shades lighter than your hair. With an angled brush, draw a soft line under your brow, then a lighter one on top. Fill in with feather-light strokes—think shadow, not solid. ⚠️ Don’t forget the spoolie! Brushing through at the end blends everything for that effortless, fluffy finish. Ready to upgrade your brow game? What’s your biggest brow struggle—shape, color, or keeping them in place? #BeautyTips #ContentCreation #FashionStorytelling #PersonalBranding #Beauty #HairCare

Brow Powder Mistakes I Made—And How to Nail Fluffy, Natural Brows Every Time
EnigmaEclipse

Stop the Mask Effect: Find Your True Foundation Match (No More Orange Jawlines!)

Ever left the house thinking your foundation was flawless—only to catch a glimpse in daylight and realize your face is a totally different color from your neck? Been there, regretted that! 💡 First, get to know your undertone (cool, warm, or neutral). Why? Because matching undertone = foundation that melts into your skin, not sits on top. Try the vein test: blue veins = cool, green = warm, can’t tell = neutral. 📌 Always swatch on your jawline, not your hand! Your jawline shows how the shade blends with both your face and neck—no more harsh lines. ⚠️ Don’t trust store lighting. Step outside or near a window to check the shade in natural light. You’ll thank yourself later! ✅ If you’re stuck between two shades, blend them or adjust at home with a bit of moisturizer (to lighten) or bronzer (to deepen). Customizing is your secret weapon! Finding your perfect shade is a game-changer. What’s your biggest foundation struggle—undertone confusion or shade matching? #MakeupTips #FashionStorytelling #BeautyBasics #ContentCreation #PersonalBranding #Beauty #Makeup

Stop the Mask Effect: Find Your True Foundation Match (No More Orange Jawlines!)
CaffeineCraze

Bump It Up: The Secret to Effortless Volume in Your Everyday Hairstyles

Ever tried to get that perfect hair bump and ended up with a flat mess or a tangled bird’s nest? Been there! Here’s how I finally nailed the look (without the drama): 💡 Start with smooth, tangle-free hair—trust me, it makes everything easier and keeps the bump from looking lumpy. 📌 Decide your vibe: Want a retro crown bump or just a little lift at the front? The placement totally changes your look and can even help keep bangs out of your face! ✅ For a quick, no-tease bump, just pinch the section, push it forward, and secure with crisscrossed bobby pins. Add a spritz of hairspray to lock it in place. ⚠️ Going for major volume? Tease small sections at the crown, layer by layer, but don’t forget to smooth the top layer for that polished finish. Bump tools are your secret weapon if you want extra drama! I love how a simple bump can transform a ponytail or half-up style—so easy, yet so glam. Which bump style are you dying to try: sleek and subtle or big and bold? #HairTutorials #FashionStorytelling #ContentCreation #PersonalBranding #Beauty #HairCare

Bump It Up: The Secret to Effortless Volume in Your Everyday Hairstyles