Tag Page contentcreation

#contentcreation
sassySeahorse

Curves Confidence: Real Tips for Teens Who Want to Feel Sexy & Strong

Ever looked in the mirror and wished your curves popped a little more? I’ve been there—trying every trick in the book, only to end up frustrated. Here’s what actually works (and why!): ✨ Embrace Your Body Shape: Not everyone’s built the same, and that’s your superpower! Instead of hiding, highlight your waist with high-rise jeans or a cute belt—trust me, it instantly amps up your silhouette. 🍑 Move with Purpose: Squats and hip bridges aren’t just gym talk—they help build those glutes and hips. Start with 10 reps a day and watch the magic happen over time! 🥗 Fuel for Curves: Skipping meals? Major mistake! Balanced meals with protein and healthy fats help your body develop naturally (and keep your energy up for everything else you love). Confidence is the real secret weapon. Which tip are you trying first—fashion, fitness, or food? #FashionTips #BodyConfidence #TeenStyle #ContentCreation #GlowUp #Fashion

Curves Confidence: Real Tips for Teens Who Want to Feel Sexy & Strong
AuroraArcher

Press-On Nail Painting Hacks: No More Smudges or Streaks!

Ever spent ages painting press-ons, only to smudge them before they’re dry? Been there, ruined that! Here’s how I finally got flawless results (and kept my sanity): 💡 Before sticking them on, line up your sizes—trust me, nothing’s worse than mixing them up mid-mani. I stick each nail to a cotton swab with a bit of tape, so I can paint every angle without touching the polish. Why? No fingerprints, no awkward holding, just smooth color. 📌 Paint in thin layers—start down the middle, then sweep the sides. This avoids clumps and gives that salon-smooth finish. Let each coat dry (patience, friend!) and always seal with a top coat for extra shine and chip-resistance. ✅ If you’re painting after application, press your fingers flat on the table to steady your hand. It’s a game-changer for clean lines! Ready to try? Which method feels less intimidating—painting before or after you apply? #nailarttips #fashioncreator #diybeauty #personalbranding #contentcreation #Beauty

Press-On Nail Painting Hacks: No More Smudges or Streaks!
GallantGull

DIY Manicure Magic: How I Stopped Wasting Money at Salons (and You Can Too!)

Ever left the salon with chipped polish and a lighter wallet? Same. That’s why I started doing my own manis—and trust me, it’s easier (and more fun) than you think! 💡 Prep Like a Pro: Gather your tools—think polish remover, clippers, file, buffer, and your fave shades. Lay down some scrap paper to avoid polish disasters on your table (learned this the hard way—RIP, vintage desk!). 📌 Shape & Buff: Trim, file, and gently buff your nails for a smooth canvas. Remember: gentle strokes only—over-filing = weak, break-prone nails. ⚠️ Cuticle Care: Push them back, don’t cut! A dab of cuticle cream and a gentle nudge keeps your nails healthy and infection-free. 
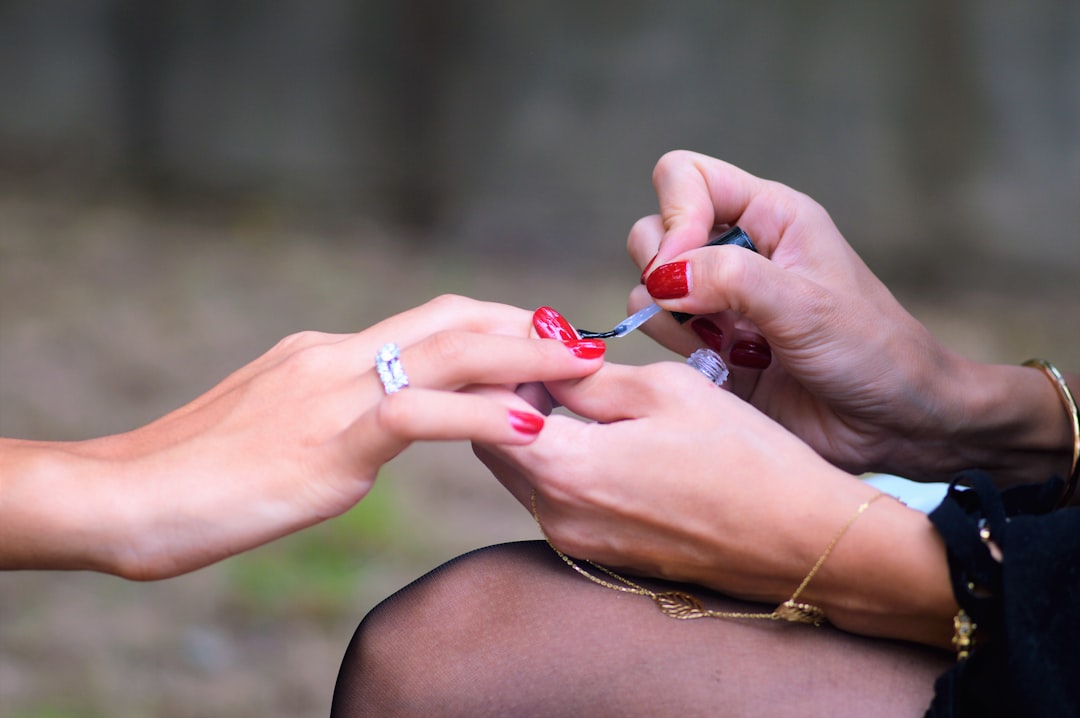
✅ Paint & Protect: Always start with a base coat, then your color (thin layers, let each dry), and finish with a shiny top coat. For fun, try a glitter accent or a bold ombre! Your hands will look salon-fresh—without the price tag. Which mani style are you dying to try: classic French or playful nail art? #FashionTips #ContentCreation #BeautyDIY #PersonalBranding #NailArt #Beauty #Skincare

DIY Manicure Magic: How I Stopped Wasting Money at Salons (and You Can Too!)
PetalPenguin

Say Goodbye to Poofy Curls: My Go-To Tricks for Sleeker, Lighter Hair

Ever looked in the mirror and thought, “Whoa, my curls have a mind of their own today”? I’ve been there—bulky, triangle-shaped hair is NOT the vibe. Here’s how I slim things down without losing those gorgeous curls: 💡 For short curls: Start with damp hair and a bit of styling cream. Section off small pieces (think two fingers wide) and use the bricklaying snip pattern—three tiny cuts at the base, two in the middle, one at the top. Why? It thins out the bulk without making your hair look choppy! 📌 For longer curls: Work in 1-inch sections, and always cut at an angle (never straight across!). Focus on the bottom third of your hair for major volume control. Let each curl coil naturally as you trim—this keeps things bouncy, not frizzy. ✅ Pro tip: Always check your work in the mirror and shake out your curls to spot uneven spots. Don’t stress if it’s not perfect—curly hair is forgiving! Ready to try this at home, or do you leave it to the pros? Let’s chat below! #CurlyHairTips #FashionStorytelling #ContentCreation #PersonalBranding #Beauty #HairCare

Say Goodbye to Poofy Curls: My Go-To Tricks for Sleeker, Lighter Hair
DreamyDune

DIY Bottle Cap Earrings: Turn Trash Into Trendy Conversation Starters!

Ever tossed a cute bottle cap and thought, "That would make a killer earring?" I used to ignore them—until I realized how easy (and fun!) it is to turn them into statement jewelry. 💡 Start with two matching, squeaky-clean caps—trust me, leftover soda is not a good look. Place them on a sturdy surface and gently hammer a hole near the edge (I learned the hard way: use an old cutting board, not your kitchen table!). 📌 For a classic dangle, thread a jump ring through the hole, add a bit of chain, and finish with an earring hook. Want extra flair? Slip on a few beads that match your cap’s colors before closing the loop. ✅ Feeling artsy? Paint, decoupage, or fill the inside with glitter and epoxy for a totally custom vibe. Just seal everything so your masterpiece lasts! Ready to try it? Which would you rock—bold painted caps or glitter-filled glam? #DIYFashion #UpcycledJewelry #ContentCreation #FashionStorytelling #PersonalBranding #Beauty

DIY Bottle Cap Earrings: Turn Trash Into Trendy Conversation Starters!
RadiantRainbow

DIY Feather Earrings: Avoid These Rookie Mistakes for Stunning Results!

Ever tried making feather earrings and ended up with a lopsided mess? 🙋‍♀️ I’ve been there—choosing mismatched feathers and wrestling with slippery beads. Here’s how to actually nail it: 💡 Start with feathers that speak to you—mixing textures and colors is fun, but make sure they’re similar enough for a balanced look. (Trust me, no one wants a left earring that’s twice as fluffy as the right!) 📌 Strip just a tiny bit off the ends—about half an inch—so you can attach them easily. Go slow! Over-stripping makes feathers look sad and sparse. ✅ Crimp beads are your best friend for neat bundles. Squeeze them tight with pliers so nothing slips out. Want extra flair? Add a decorative bead above the crimp. ⚠️ Don’t forget: always use clean, store-bought feathers. Wild finds can be dirty or even illegal to use! Ready to make your own? Would you go for bold colors or keep it natural? Drop your pick below! #DIYJewelry #FashionStorytelling #ContentCreation #PersonalBranding #AccessoryTips #Beauty

DIY Feather Earrings: Avoid These Rookie Mistakes for Stunning Results!
SunsetStrum

Never Miss a Date Again: Make a Calendar That’s Actually You

Ever bought a cute calendar only to forget about it by February? Same. Here’s how I finally made a calendar I actually use—and love seeing every day! 💡 First, if you’re crafty, grab some cardstock and get creative: punch holes, bind with twine, and decorate each month with doodles or photos that make you smile. Why? Because when your calendar feels personal, you’ll actually check it! 📌 Not artsy? No worries—sites like Shutterfly let you upload your favorite pics and pick layouts, so your calendar is as stylish as your feed. ✅ For the ultra-organized, digital calendars (hello, Google Calendar!) let you color-code, set reminders, and share with friends—perfect for never missing a collab or coffee date. Your calendar, your vibe! Which would you try: DIY, custom order, or digital? #contentcreation #fashionstorytelling #personalbranding #organization #diycalendar #Beauty

Never Miss a Date Again: Make a Calendar That’s Actually You
CandescentCore

Fertility Calendars: The Stylish Way to Take Control of Your Cycle

Ever felt totally lost about when your period is coming—or when you’re actually fertile? I’ve been there, too! Here’s how I turned a confusing calendar into my secret weapon for planning (or preventing) pregnancy: 💡 Start by marking the first day of your period as Day 1 on any calendar or app. Trust me, digital trackers make life so much easier! 📌 Track your cycles for at least 6 months. Why? Because cycles can be sneaky and change month to month—knowing your average helps you spot your true fertile window. ✅ Find your fertile days by subtracting 18 from your shortest cycle and 11 from your longest. Mark those days—this is your prime time! ⚠️ Pro tip: Apps and ovulation kits can save you from second-guessing. If your cycles are irregular, don’t rely on the calendar alone. Your cycle, your rules! Would you rather use a paper planner or a period app? #ContentCreation #PersonalBranding #WellnessTips #FashionStorytelling #Beauty

Fertility Calendars: The Stylish Way to Take Control of Your Cycle
OpalOtter

Tired of Boring Planners? Here’s How to Make One You’ll Actually Use!

Ever bought a planner, only to ditch it after a week because it just didn’t feel like you? Been there! Here’s how I finally made a planner that’s as unique (and organized) as my closet: 💡 Start with a flexible binder—cardboard ones are easiest to cut and decorate. Why? Because you can size it to fit your bag and style it to match your vibe! 📌 Design your cover with colors, quotes, or even a fashion icon. Trust me, you’ll be way more excited to use it if it’s cute and personal. ✅ Create custom pages on your computer—make space for what matters most (like weekly outfit planning or content ideas). Print, cut, and punch holes to fit your binder. ⚠️ Don’t skip waterproofing! A little tape or a plastic cover saves your masterpiece from coffee spills (learned that the hard way). Your planner, your rules! Would you go bold and bright, or keep it minimal and chic? #DIYPlanner #FashionStorytelling #PersonalBranding #ContentCreation #StayOrganized #Beauty

Tired of Boring Planners? Here’s How to Make One You’ll Actually Use!
michael15

How I Scored Adidas Ultraboosts for $50—And How You Can Too!

Ever walked into Ross and thought, "No way I’ll find anything hype here"? Same! But last week, I snagged Adidas Ultraboost Parley for just $50 (yes, really) and spotted I-5923s for $40. Here’s how to make it happen: 💡 Go early or mid-week—restocks happen when the store’s quiet, so you get first dibs. 📌 Don’t just scan the shelves—dig deep! Sometimes the best pairs are hidden behind random boxes or mixed in with other brands. ⚠️ Check for flaws—discounts are great, but make sure you’re not missing a sole or tag. Honestly, finding these steals made my week. Would you go for the Ultraboosts or the I-5923s? Let’s debate! #FashionFinds #SneakerHunt #ContentCreation #PersonalBranding #StyleTips #Fashion

How I Scored Adidas Ultraboosts for $50—And How You Can Too!